Chapter 2 — Modeling Modes
DigitalClay3D supports four ways to build a silhouette. Pick the one that matches what you're trying to make; you can switch modes at any time but each mode owns its own state, so don't expect a polygon profile to follow you into Revolution mode.
| Mode | When to pick it |
|---|---|
| Revolution | Classic vase / bottle / bowl — anything axisymmetric. The fastest path. |
| Lofting (Single) | Cross-sections that change shape as they go up — tapered ovals, twisted square-to-round transitions. |
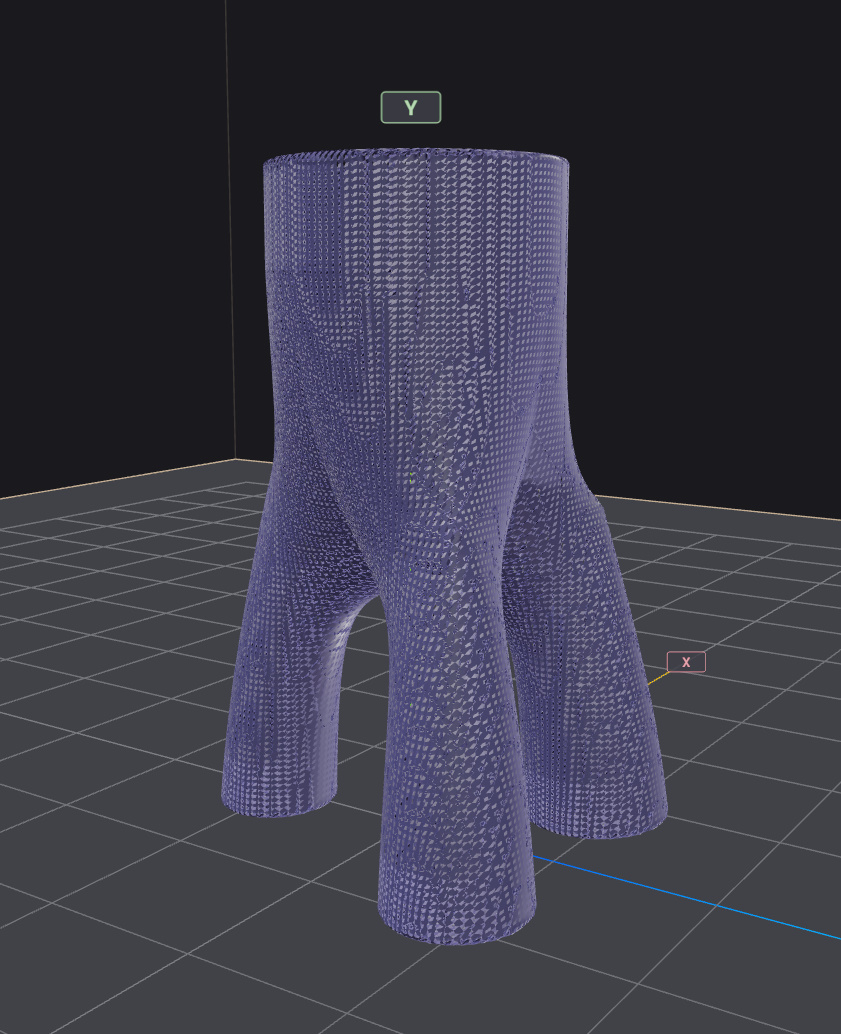
| Lofting (Multi-Object) | Branching forms — three legs merging into a single trunk, octopus-style multi-foot bases. Experimental. |
| Intelligent | You have a reference photo of a vase and want a parametric model that matches its silhouette. |
You set the mode in the Shape tab via the Mode dropdown at the top.
Revolution mode
The default. The model is built by spinning a 2D profile around the Y axis. Edit the profile, the 3D shape follows immediately.
The Shape tab in Revolution mode breaks into two stacked sections — the Object Settings panel at the top (model name, mode dropdown, height & diameter, scale operations, profile shape) and the Revolution Profile + Wall/Floor + Base panels below it:
| Panel | Screenshot |
|---|---|
| Object Settings | 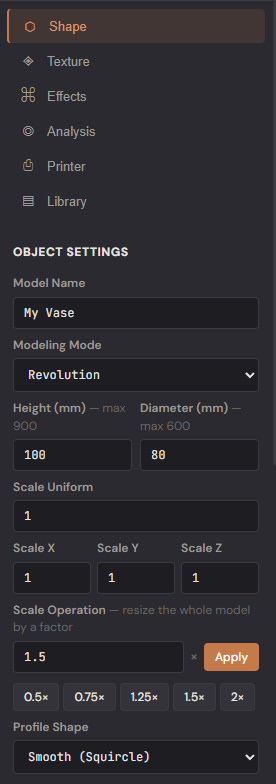 |
| Profile + Wall/Floor + Base | 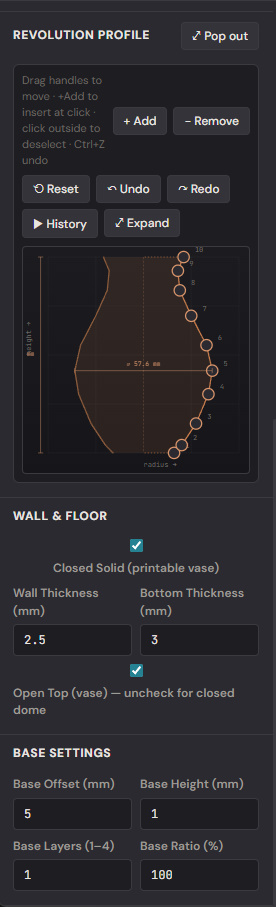 |
The profile editor is the panel on the left. Each dot is a control
point with X (radius fraction, 0..1) and Y (height fraction, 0..1).
Drag a dot to reshape; click an empty area on the curve to add one.
Right-click to delete.
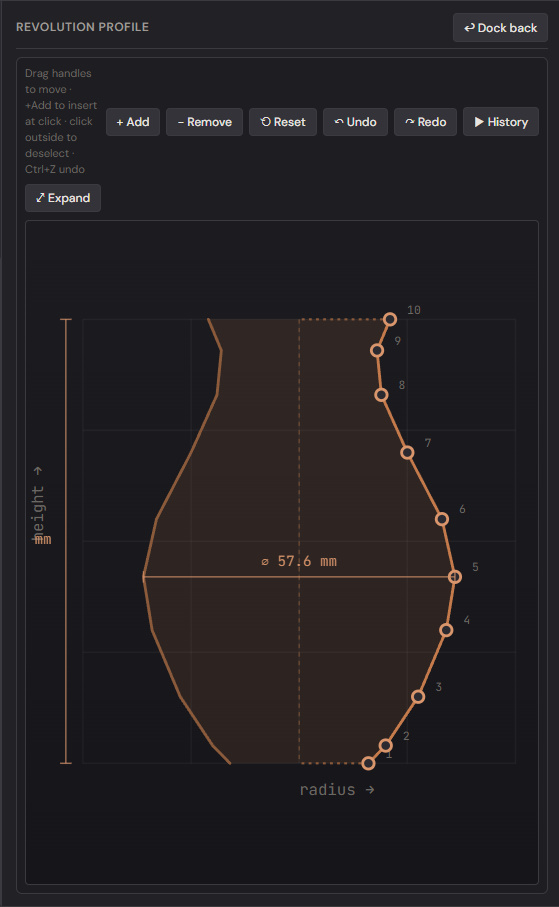
Pop the editor out to a wider canvas next to the 3D view via the
⤢ Pop out button — useful when fine-tuning the curve while watching the
result.
Profile control points in 3D — when Show Profile Points is on in the Dimensions overlay, the same control points render as draggable spheres on the 3D model itself, with their Y/X coords as tooltips. Lets you sculpt the profile directly on the 3D view.
Cross-section profile
By default the cross-section is a smooth circle. Switch the Profile Shape to Polygon to give the body a faceted feel (3-side triangle, 6-side hex, 12-side dodecagon, etc.). The Chamfer Radius rounds polygon edges so they don't print as hard lines.
Starter Shapes — silhouette
The Starter Shapes panel sits between Object Settings and the Revolution Profile editor. Each button replaces the current silhouette with a curated outline so you don't have to drag dots from scratch when starting a model.
| Group | Shapes |
|---|---|
| Geometric | Cylinder, Cone, Sphere, Egg, Hourglass |
| Vessels | Vase, Bottle, Carafe, Pitcher, Amphora, Genie |
| Open forms | Bowl, Goblet, Tumbler |
| Lighting / architectural | Bell, Lantern, Onion Dome |
| Parameterized | Polygon (sides 3-24), Stepped (tiers 2-8) |
When a parameterized shape is selected, a single editable field ("sides" / "tiers") appears at the top of the Starter Shapes panel — edit the value and the silhouette rebuilds live, no re-click needed. The active starter button is highlighted while it's the source of the current silhouette; manual drag-edits to the profile don't change the highlight, but loading a different starter will.
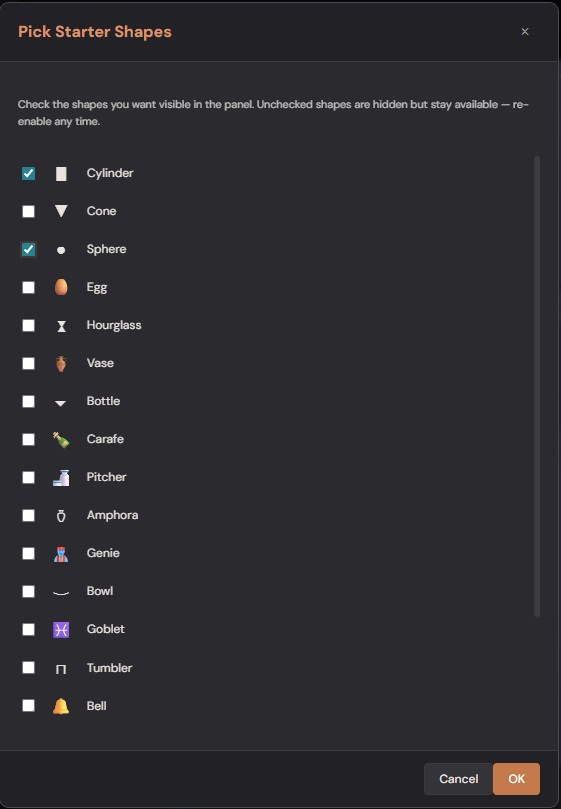
A Pick… link in the Starter Shapes header opens a checklist of every shape with previews — curate the panel down to the silhouettes you actually use.
Lofting — Single-Object
Lofting interpolates between user-drawn cross-sections at different heights. Useful when you need the silhouette to vary in shape — not just diameter — as it rises.
The Shape tab in Lofting mode shows three stacked panels — the layer list, the active layer's cross-section editor, and the Lofting Options group below it:
| Panel | Screenshot |
|---|---|
| Layer list + add/remove |  |
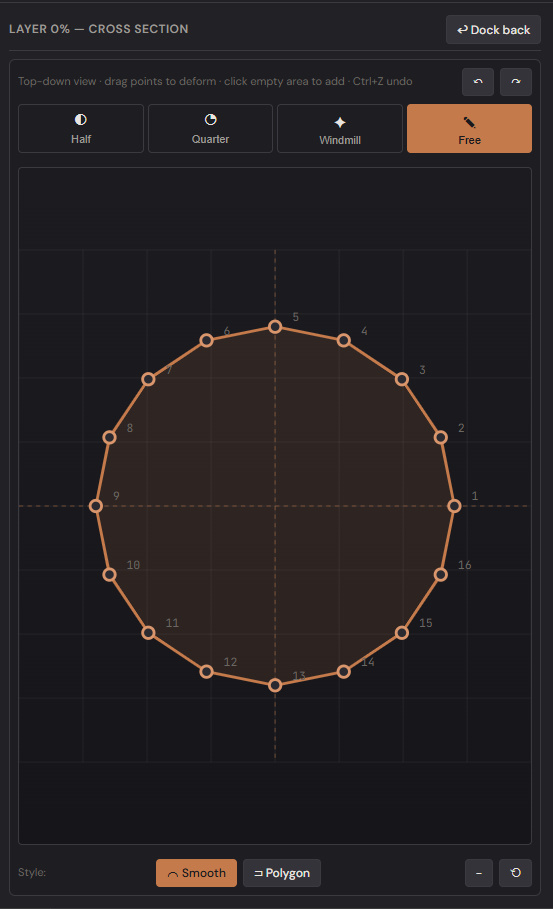
| Active layer's cross-section editor | 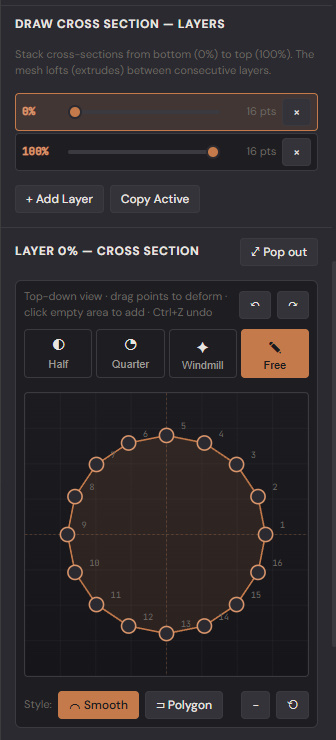 |
| Lofting Options (rotate / random) | 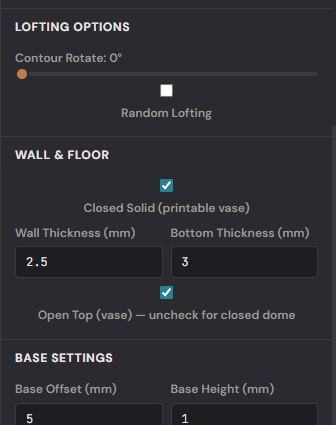 |
The Layers panel lists every cross-section by height percentage, top of the model first. Click a row to make it the active layer.
- + Add Layer drops a new layer at the top of the stack. Slide it down via that row's slider to position it between existing layers.
- Copy Active duplicates the selected layer and parks the copy directly above the original (between it and the next-higher layer), so related layers stay grouped.
- The slider on each row sets the layer's height (0% = base, 100% = top). Drag the slider to reorder — the list re-sorts itself as the height changes.
- The
×removes a layer.
When a layer is selected, a yellow ring is drawn around the 3D model at that layer's exact perimeter, so you can see which slice you're editing without counting from the top.
The Cross-Section Editor below shows the active layer's polygon. Pick a symmetry mode at the top:
| Mode | Behaviour |
|---|---|
| Half | You draw the right half; the left mirrors automatically. |
| Quarter | You draw one quadrant; the other three mirror. |
| Windmill | Four-fold rotational symmetry — a single quadrant rotates 4× around the centre. |
| Free | No mirroring — every point is drawn explicitly. |
Below the mode row, the Transform strip operates on the layer's points as an "object":
- Rotate ↺ −15° / ↻ +15° — capped at one full revolution per layer so repeated clicks don't accumulate floating-point drift past 360°.
- Scale − 10% / + 10% — shrinks or grows the pattern inside the
canvas. Once the pattern reaches the canvas edge, further
+clicks expand the layer's physical diameter instead, up to the printer's inscribed plate diameter minus a 5 mm wall clearance. Only the active layer grows; layers above and below keep their own scale. - Move ← ↑ ↓ → — translates the pattern by 5% of the canvas extent per click. ⊙ recenters the pattern's centroid on the spin axis.
- Zoom — three buttons in the upper-right corner of the canvas
(
+/−/⊙ reset) shrink or expand the visible viewBox. Useful for fine-tuning points on small shapes.
When the active layer is a parameterized starter (Polygon, Star, Cross,
Flower, Gear, etc.), a single editable field for that parameter sits
above the canvas — sides, points, arms, petals, teeth, etc.
Edit the value and the loaded shape rebuilds live without re-clicking.
Adjacent layers render as faint dashed outlines behind the active curve so successive cross-sections can be aligned visually. The layer-below ghost uses the accent colour; the layer-above ghost uses a muted grey. The ghosts scale by each neighbour's per-layer Scale ratio so a physically wider layer reads as a wider ghost.
Style is Smooth (Catmull-Rom curve through points) or Polygon (straight segments). Pop the editor out for a bigger canvas.
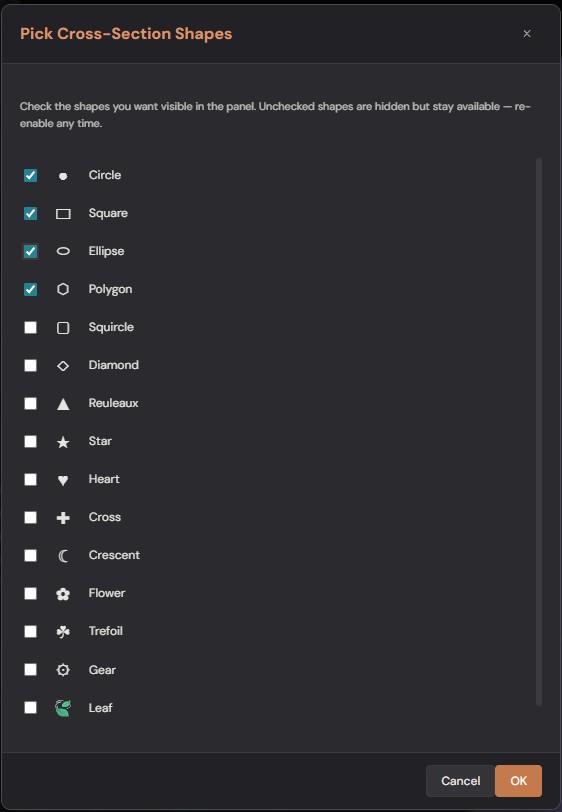
Starter Shapes — cross-section
Below the Style toolbar, the Starter Shapes grid replaces the active layer's points with a curated outline so you don't have to drag dots from a default circle every time:
| Shape | Parameter | Notes |
|---|---|---|
| Circle, Square, Heart, Crescent, Leaf, Lens | — | Fixed geometry. |
| Polygon | sides 3-24 | Regular N-gon. |
| Ellipse | aspect 2-8 | X:Z ratio. |
| Squircle | roundness 2-12 | 2 = circle, 4 = rounded square, 12 ≈ chamfered square. |
| Diamond | aspect 1-6 | Height:width ratio. |
| Reuleaux | sides 3-7 (odd) | Curve of constant width — even values round down to odd. |
| Star | points 4-32 | Inner-radius ratio adapts so stars stay readable at any point count. |
| Cross | arms 3-8 | N-armed rectangular cross. |
| Flower | petals 3-8 | Sharp narrow petals. |
| Trefoil | lobes 3-6 | Gothic-window rounded lobes (rounder than Flower). |
| Gear | teeth 6-24 | Tooth height scales with tooth count so the silhouette stays uniform at any value. |
After clicking a starter, the parameter input above the canvas drives a live rebuild. Manual edits to the points (drag handles, transform buttons) take effect immediately, and the layer's existing per-layer Scale carries through to the loaded shape.
As with Revolution's Starter Shapes panel, a Pick… link in the header opens a checklist for hiding cross-sections you never reach for.
Lofting Options
The mesh lofts (extrudes + interpolates) between consecutive layers, including per-layer scale so an upper layer with a larger physical diameter widens smoothly toward the top.
- Contour Rotate — twists each layer relative to the one below. 0° produces a clean stack; 180° spirals halfway up the model; 360° completes one full revolution. Capped at 360° because beyond that the geometry just repeats and the slicer struggles with self-intersecting toolpaths.
- Random Lofting — toggles a small radial perturbation on intermediate rings (the rings between user-drawn key layers). Key rings stay exact so your drawn cross-sections aren't distorted; only the in-between geometry gets the organic noise.
Lofting — Multi-Object (experimental)
A different lofting engine that lets you place up to 8 round or square primitives per layer. Adjacent layers' primitives merge automatically: three circles at the base smoothly become one circle at the neck — the classic octopus-base / branched-vase problem solved with a single watertight mesh.
Enabling it: Settings → Experimental → tick Multi-Object Lofting. The Lofting Mode dropdown will then appear at the top of the Shape tab's Lofting panel, alongside the Single-Object option.

The plan-view editor is a top-down 2D canvas:
- Click + Round or + Square to drop a primitive at the canvas centre. You can place up to 8 per layer.
- Drag the body of any primitive to reposition it.
- Click a primitive to select it; corner handles appear.
- Drag a corner to resize; the cursor follows even when the primitive is rotated.
- Numeric inputs below let you fine-tune Center X / Z, Width, Height, Rotation°.
- The previous and next layers' primitives render as faint dashed outlines so you can stack shapes vertically.
The mesh is generated using SDF + Marching Tetrahedra: each primitive's signed distance field is rasterized to a 2D grid, layers are linearly blended along Y, and the 3D iso-surface is extracted. The result is watertight and topology-changing, so 3-tubes-into-1-trunk is seamless.
Surface Smoothness slider — under the Lofting Mode dropdown. At 0 the SDF lerps linearly between layers (visible creases at every layer boundary). Crank it to 0.5–0.7 for a smooth body; 1.0 polishes everything to a near-perfect surface but loses some sharpness on tight curvature.
Textures and surface effects don't apply in Multi-Object mode — the SDF mesh has no axisymmetric vertex layout for those passes to target. The Texture and Effects tabs show a notice when you're in this mode.
Intelligent mode
You drop in a reference image (a photograph or sketch of a vase). The silhouette is auto-traced — the foreground/background separation uses alpha for transparent PNGs and a corner-colour distance threshold for opaque images. The result becomes a Revolution profile you can then edit.
| Stage | Screenshot |
|---|---|
| Image picker + sample-count slider | 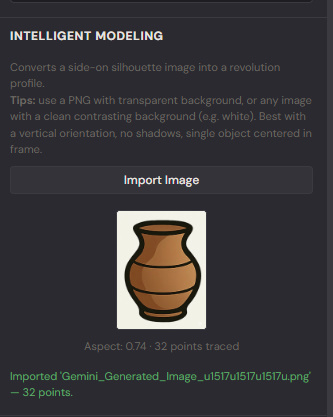 |
| Traced profile + 3D result | 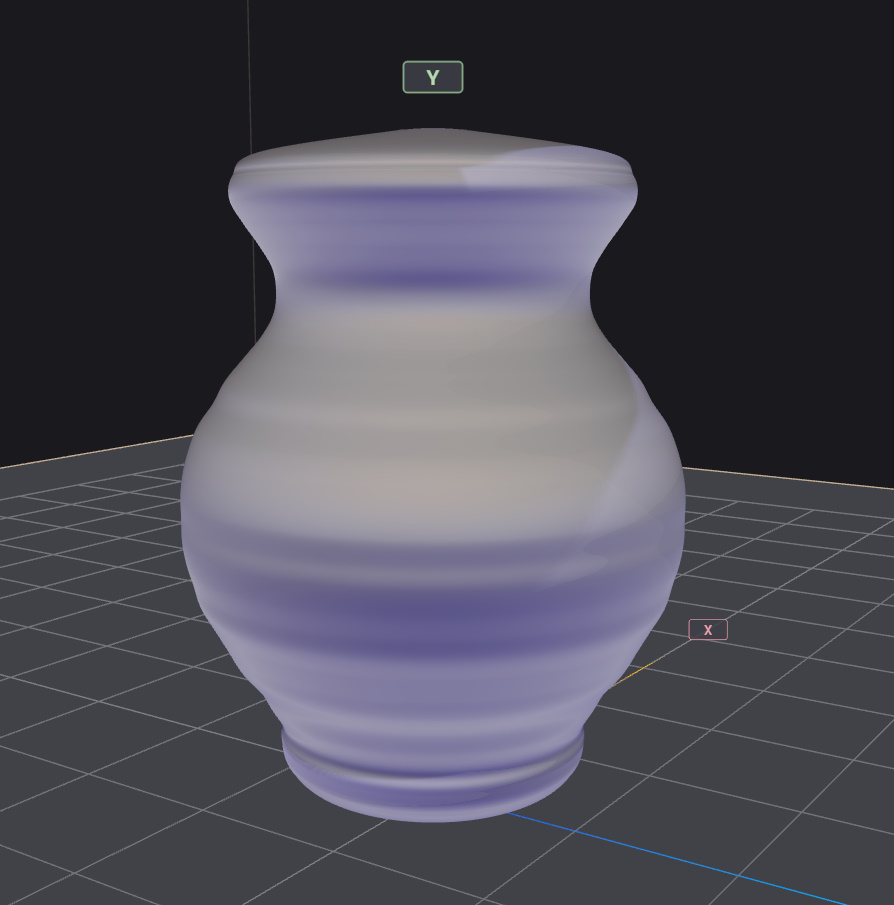 |
Workflow:
- Switch to Intelligent mode.
- Click Pick Image and select a PNG / JPEG.
- The thumbnail appears in the panel with the trace status (number of points sampled, silhouette aspect ratio).
- The model updates to match the traced silhouette. Aspect ratio is honoured automatically — a tall narrow image produces a tall narrow vase.
- Optionally tweak the Sample Count to change profile resolution (more samples = more curve fidelity).
- Switch back to Revolution mode to fine-tune the profile manually.
Unsupported inputs surface a friendly message: "Couldn't find a silhouette — is the background plain enough?"
What to read next
- Chapter 3 — Shape Tools for the pottery wheel, dimensions overlay, and build-plate management that apply to every modelling mode.
- Chapter 4 — Surface Decoration for textures and the Pattern Graph Editor.